
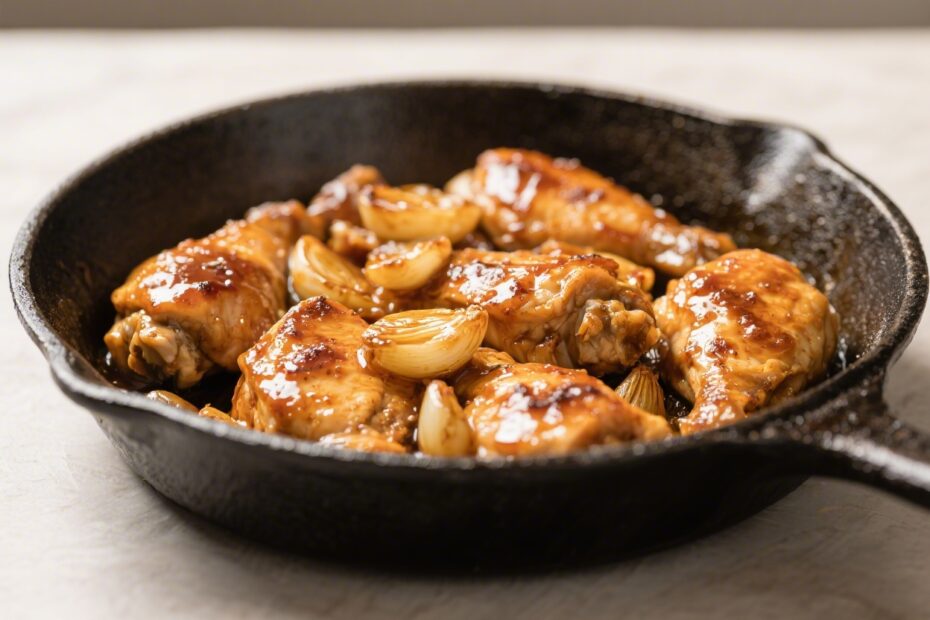
If you’re craving a quick, comforting dinner that tastes like you put in way more effort than you did, this One Pan Honey Garlic Chicken is it. It’s sweet, savory, sticky, and made with simple pantry staples. Best of all, everything cooks in one skillet, so cleanup is painless.
The sauce clings to juicy chicken and lightly caramelized edges, with just enough garlic to make the whole kitchen smell amazing. Pair it with rice, greens, or roasted veggies, and you’ve got a balanced, crowd-pleasing meal any night of the week.
Why This Recipe Works
– One pan efficiency: Searing and simmering in the same skillet builds flavor and keeps cleanup simple. – Balanced sauce: Honey brings sweetness, soy sauce adds umami, vinegar brightens, and garlic ties it all together. – Quick cook time: Boneless chicken cooks fast and stays tender when simmered in sauce. – Customizable: You can swap cuts of chicken, adjust sweetness, or add spice without losing the core flavors.
Shopping List
- Chicken: 1.5 to 2 pounds boneless, skinless chicken thighs (or breasts)
- Salt and black pepper
- All-purpose flour (optional, for light dredging)
- Olive oil or neutral oil (such as avocado or canola)
- Unsalted butter
- Garlic: 4–6 cloves, minced
- Honey: 1/3 cup
- Soy sauce: 1/4 cup (low-sodium preferred)
- Rice vinegar or apple cider vinegar: 1–2 tablespoons
- Chicken broth: 1/4 cup
- Red pepper flakes or a dash of hot sauce (optional)
- Cornstarch: 1–2 teaspoons (optional, for thicker sauce)
- Sesame seeds (optional, for garnish)
- Green onions (optional, for garnish)
- Lemon or lime (optional, for a squeeze of freshness)
Step-by-Step Instructions

- Prep the chicken: Pat the chicken dry and cut large pieces into uniform sizes for even cooking. Season both sides with salt and pepper.
For extra crust, lightly dredge in flour and shake off the excess.
- Heat the pan: Place a large skillet over medium-high heat. Add a tablespoon of oil and a small knob of butter. When it shimmers, it’s ready.
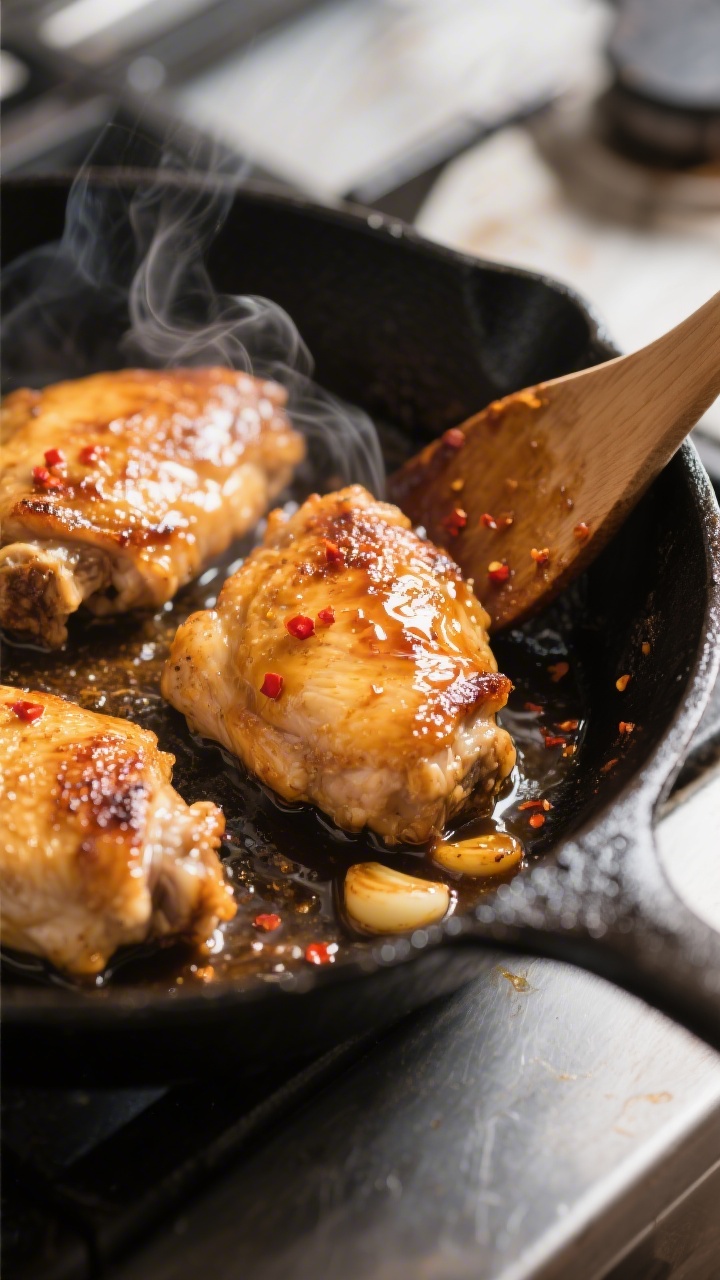
- Sear the chicken: Add chicken in a single layer without crowding.
Sear 3–5 minutes per side until golden. It doesn’t need to be fully cooked yet. Transfer to a plate and keep warm.
- Sauté the garlic: Lower heat to medium.
Add another small pat of butter if the pan looks dry. Stir in minced garlic and cook 30–45 seconds until fragrant. Don’t let it brown.
- Build the sauce: Pour in honey, soy sauce, vinegar, and chicken broth.
Stir and scrape up browned bits from the pan. Add red pepper flakes if using.
- Thicken (optional): If you like a stickier glaze, whisk 1–2 teaspoons cornstarch with 1 tablespoon water, then stir into the sauce. Simmer 1–2 minutes until glossy.
- Return the chicken: Add the chicken and any juices back to the skillet.
Spoon sauce over the top. Simmer 4–6 minutes, flipping once, until the chicken is cooked through (internal temp 165°F/74°C) and the sauce clings.
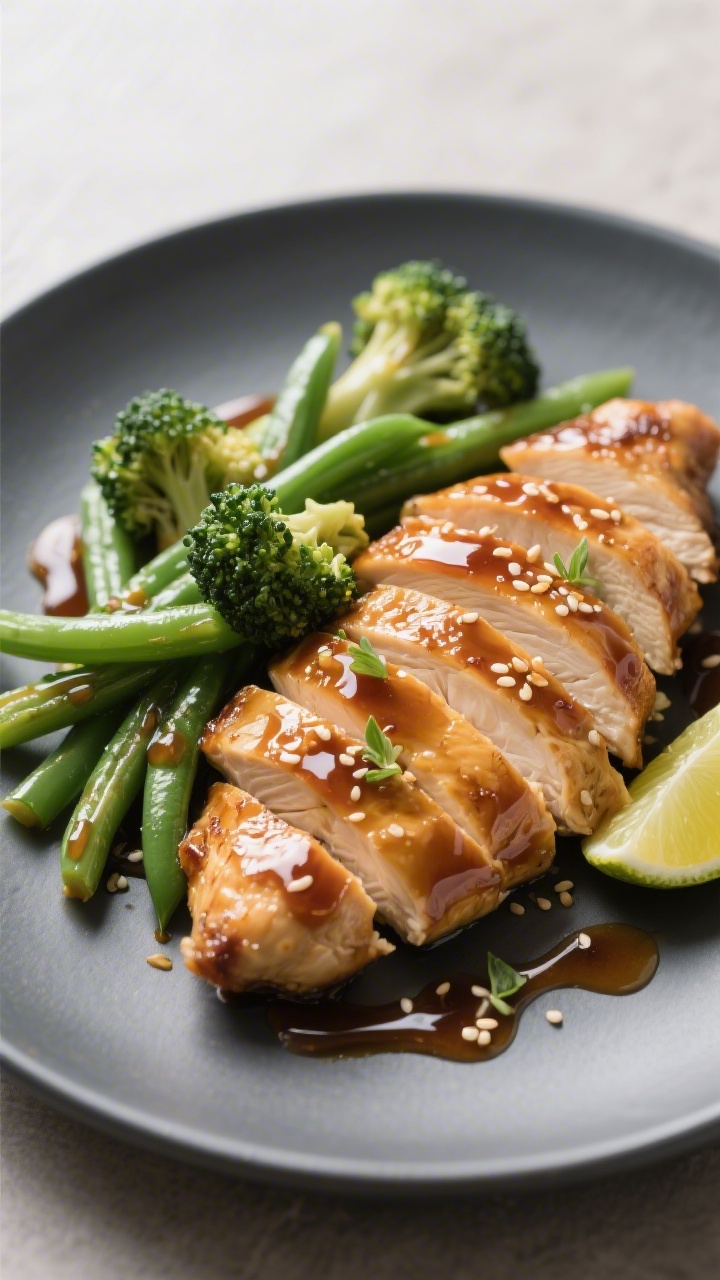
- Finish and garnish: Taste and adjust. Add a squeeze of lemon or lime if you want more brightness.
Sprinkle with sesame seeds and sliced green onions.
- Serve: Plate with steamed rice, sautéed green beans, broccoli, or a crisp salad. Spoon extra sauce over everything.
Keeping It Fresh
– Storage: Cool completely, then refrigerate in an airtight container for up to 4 days. – Reheating: Warm gently in a skillet over low heat with a splash of water or broth. Microwave in short bursts, stirring between, to avoid overcooking. – Freezing: Freeze cooked chicken and sauce for up to 2 months.
Thaw overnight in the fridge, then reheat gently. – Make-ahead: Mix the sauce up to 3 days in advance and store chilled. Marinate the chicken in 2–3 tablespoons of the sauce for extra flavor (pat dry before searing).
Health Benefits
– Lean protein: Chicken provides essential amino acids that support muscle repair and keep you satisfied. – Garlic goodness: Garlic contains allicin and antioxidants that may support heart health and immune function. – Better balance: Using low-sodium soy sauce and a measured amount of honey keeps sodium and added sugar in check. – Smart sides: Pair with fiber-rich veggies and whole grains like brown rice or quinoa for a fuller nutrient profile. – Control the fat: A quick sear in a modest amount of oil keeps calories reasonable without sacrificing flavor.
Common Mistakes to Avoid
– Crowding the pan: Overlapping chicken steams it instead of searing. Cook in batches if needed. – Burning the garlic: It turns bitter fast.
Lower the heat before adding and stir constantly. – Over-reducing the sauce: The honey thickens quickly. Simmer gently and pull the pan off heat once glossy. – Skipping seasoning: Salt and pepper the chicken first. It makes a big difference in flavor. – Uneven pieces: Cut chicken to similar sizes to avoid some pieces drying out while others lag behind.
Recipe Variations
– Spicy Honey Garlic: Add 1–2 teaspoons sriracha, a pinch of cayenne, or extra red pepper flakes to the sauce. – Ginger Twist: Grate 1 tablespoon fresh ginger with the garlic for a warm, zesty kick. – Citrus Boost: Replace part of the broth with orange juice, and finish with orange zest. – Crispy Bites: Cut chicken into 1-inch pieces, dredge lightly in cornstarch, and sear for extra crisp edges before saucing. – Veggie Add-Ins: Toss in snap peas, bell peppers, or broccoli florets when you add the chicken back to the pan.
Cook until tender-crisp. – Breasts Instead of Thighs: Use chicken breasts sliced into cutlets. Cook time will be shorter; watch closely to avoid drying out. – Gluten-Free: Use tamari or coconut aminos and skip the flour dredge. Thicken with cornstarch if desired.
FAQ
Can I use bone-in chicken?
Yes, but adjust the method.
Sear the bone-in pieces until well browned, then simmer covered in the sauce over low heat until cooked through. The total cook time will be longer, around 20–30 minutes depending on size.
How do I keep the sauce from getting too sweet?
Use a bit more vinegar or add a squeeze of lemon or lime at the end. You can also reduce the honey to 1/4 cup and increase the soy sauce slightly for a more savory balance.
What can I substitute for soy sauce?
Use tamari for gluten-free, or coconut aminos for a slightly sweeter, lower-sodium option.
Adjust the honey to taste since coconut aminos are naturally sweeter.
My chicken stuck to the pan. What went wrong?
The pan may not have been hot enough, or you tried to flip too early. Let the chicken sear undisturbed until it naturally releases.
A bit of oil and preheating make a big difference.
Can I make this without cornstarch?
Absolutely. Just simmer the sauce a minute longer to reduce. It will still get glossy from the honey, though slightly looser than a thick glaze.
Is this recipe good for meal prep?
Yes.
It reheats well and pairs with rice, quinoa, or steamed veggies in meal prep containers. Keep sauce on the side if you want to prevent rice from getting soggy.
Can I add vegetables directly to the pan?
Go for it. Add quick-cooking veggies like snap peas or thin-sliced peppers during the final simmer.
For denser veggies like broccoli, steam or sauté briefly first, then finish in the sauce.
Final Thoughts
One Pan Honey Garlic Chicken is the kind of weeknight win that never gets old. It’s fast, flexible, and full of flavor, with a glossy sauce that makes even simple sides taste special. Keep the ingredients on hand, and you can pull this off anytime, whether you’re feeding family or just yourself.
With a few smart tweaks, it can be spicy, citrusy, or extra garlicky—whatever you’re craving. Simple, satisfying, and done in one pan.

Ingredients
Method
- Prep the chicken: Pat the chicken dry and cut large pieces into uniform sizes for even cooking. Season both sides with salt and pepper. For extra crust, lightly dredge in flour and shake off the excess.
- Heat the pan: Place a large skillet over medium-high heat. Add a tablespoon of oil and a small knob of butter. When it shimmers, it’s ready.
- Sear the chicken: Add chicken in a single layer without crowding. Sear 3–5 minutes per side until golden. It doesn’t need to be fully cooked yet. Transfer to a plate and keep warm.
- Sauté the garlic: Lower heat to medium. Add another small pat of butter if the pan looks dry. Stir in minced garlic and cook 30–45 seconds until fragrant. Don’t let it brown.
- Build the sauce: Pour in honey, soy sauce, vinegar, and chicken broth. Stir and scrape up browned bits from the pan. Add red pepper flakes if using.
- Thicken (optional): If you like a stickier glaze, whisk 1–2 teaspoons cornstarch with 1 tablespoon water, then stir into the sauce. Simmer 1–2 minutes until glossy.
- Return the chicken: Add the chicken and any juices back to the skillet. Spoon sauce over the top. Simmer 4–6 minutes, flipping once, until the chicken is cooked through (internal temp 165°F/74°C) and the sauce clings.
- Finish and garnish: Taste and adjust. Add a squeeze of lemon or lime if you want more brightness. Sprinkle with sesame seeds and sliced green onions.
- Serve: Plate with steamed rice, sautéed green beans, broccoli, or a crisp salad. Spoon extra sauce over everything.
Tried this recipe?
Let us know how it was!Discover More Delicious Ideas 🍽️
If you need dinner inspiration for busy evenings, explore our
Dinner Recipes category.
If you’re craving delicious chicken meals, browse our
Chicken Recipes category.
If you need dinner on the table fast, explore our
Quick & Easy category.
If you’re craving new flavors, take a look at our
World Cuisine category.
If you want something lighter but still satisfying, visit our
Healthy & Light category.
If you’re in the mood for a treat, find something sweet in our
Sweets & Desserts category.
If you like to plan ahead, get inspired in our
Meal Prep & Planning category.
If you’re keeping it low carb and still want satisfying meals, explore our
Keto Weight Loss category.
If you’re looking for detox drinks, smoothies, or kid-friendly blends, browse our
Juices & Smoothies category.
If you want to see the kitchen tools and gadgets I personally use for cooking and meal prep, visit my
My Kitchen Essentials page.
Or explore everything in one place in
All Recipes.
Printable Recipe Card
Want just the essential recipe details without scrolling through the article? Get our printable recipe card with just the ingredients and instructions.